A sample repository.
Creating and maintaining a good repository structure and software development workflow is always a great challenge, but if it is designed well it can improve the productivity by at least one order of magnitude. In this document, we are summarizing our experience on the topic by discussing repository structures and workflows suitable for cooperative development and eventually for delivering software releases.
Here we describe a basic structure for a Subversione repository, and add some rules or rule-of-thumbs for using each part of it. For easier understanding, we provide some example use cases and scenarios to this system that hopefully helps to put users on the right track. Of course, as always, comments, remarks, and questions are welcome. It also recommended to read the Subversion book for the details.
A key to understand how to work with Subversion is to make ourselves comfortable with the layout of the actual repository. Note that it is not required to use all the directories in the repository, everybody is free to do so-called "sparse checkouts" and work with only the parts that is needed. A sparse checkout means that we do not checkout the top-level directory but one or more of its sub-directories.
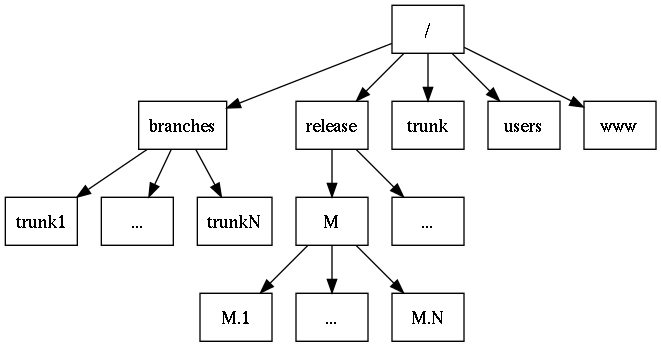
A sample structure of a repository from the top is as follows.
A sample repository.
Let us take a look at each of these directories (in the order they are used):
branches: A common directory containing all the on-going sub-projects within the project itself. They can be called "work-in-progress" or "experimental" projects, where the contents is not ready for being published yet. If something is not finished but already shared between people in the project, it should be stored here. One might think of it as an incubator for potential future features.
Copies (branches) of trunk (see below) are stored here, each of them is to host a development of a given future feature. All of the branches maintain a strong relation with the trunk branch, i.e. changes are migrated between them continuously in both directions. When a development branch is completed, it is strongly recommended to be closed (deleted). Before closing, contents of the branch should be (totally or partially) merged back to trunk depending on the success of the development.
trunk: It is the branch where all features from the branches directory meet after they have been successfully completed. As a rule of thumb, this directory should always contain a version of the current development which might be used by fellow developers, therefore it is strongly advised to be kept in a consistent, usable shape. After each experimental feature is finished, they should be integrated here, queued up for the next release. The stability of the branch can be automatically monitored by employing a continuous integration server solution.
release: The purpose of this directory is to store every published release and lines of release, so problem reports or patches connected to them can be processed easily. For each major release, an invidiual branch is created to contain a "stable" version of the software being developed. This branch may be then used for publication of the actual releases. It only requires of creation of a tag that is never modified after. That is the X.Y releases are branches of trunk, and X.Y.Z... ("patch level") releases are tags of an existing X.Y release line. This will be described in details below.
users: User directories with the names (Subversion identifiers preferred) for developers. Here one can store really experimental work and sources which are not related strictly to any part of the development yet.
www: Project home pages, a published interface to the outside world. If something is committed here, it will appear on the project's web site. The intention behind the recommendation of this directory is to store every published information in a version-controlled format, therefore it can be easily overseen what has been published when by who.
The main concepts in controlling versions with Subversion are introduced in this section. Getting familiar with them is important for the efficient usage of the repository. For the rest of the document, we will refer project repository URL as $SVNBASE, and the local working copy base as $BASE. Every time it is used the reader should use the URL of the Subversion repository and the client-side directory he uses for local copies (e.g. /home/bozo/wundertool) respectively.
In terms of Subversion, "to check out" means "to get a local copy of the central repository". It can be done by the svn checkout command (or svn co for short) by providing a path of the central repository (in our case, this is $SVNBASE) together with a sub-path of a given part of the repository (in our case, this might be users/bozo) optionally. If there is no sub-path specified, the Subversion client will check out the entire repository which can be huge since the latest revision of everything is downloaded from the central server.
This is where the concept "sparse checkout" comes into play. When doing a sparse checkout, only the necessary parts are checked out, nothing more. This way we can reduce the complexity of the original structure as we have custom views of it that helps to focus on the relevant pieces only. Note that Subversion does not support checking out single files but directories. That means if one would like to check out a single one must check out its parent directory. However, to avoid checking out anything else than files in the same directory, one may use the -N (--non-recursive) flag when invoking svn checkout.
User bozo would like to access the experimental project called skeleton under the name skeleton on his client. To get it, he needs to issue the following command:
$ svn checkout $SVNBASE/branches/skeleton $BASE/skeleton
...
To understand where the skeleton directory comes from, we need to become familiar with the concept of copying in Subversion. Copies in Subversion are "cheap", i.e. they are not like traditional copies since it is a version control system, a persistent database. Because Subversion records all previous revisions of all files, and therefore there are no destructive updates in that sense, copying files is just having a specific revision under a different name (or sub-path). In Subversion, these names are called "tags". Tags might be modified, i.e. we might want to update them, then Subversion starts to store the differences compared to the base point (the revision we tagged). If we update tags then we get branches. According to this, copies, tags and branches are handled in the same way, Subversion does not make difference between them.
From the user's point of view, copying branches is favorable when he wants to work on a given branch without disturbance. It is like taking the current state of development home, and playing with it in a comfortable environment -- "If something has worked in my copy before it should still work today". In a private branch, we are free to do anything with the contents to our liking, nobody else will blame us :-) Thus it is also considered a good practice for managing different features developed in parallel.
User bozo has had to have a project somewhere in the branches directory to be able to check it out. Let us assume there is a project called skeleton, branched right from the trunk branch. As we have mentioned earlier, trunk contains the latest development version of the software. Everyone who wants to do some experimental work needs to branch from here and his branch will need to be updated against trunk later on.
User bozo and biafra decided to work on some extension to the software, so they branched the main line of development.
$ svn copy --message "Branch trunk for the skeleton project" $SVNBASE/trunk $SVNBASE/branches/skeleton
Note that nothing will be created on the client side here, since we are performing a server-side copy. It is because both source and target of the copy operation are remote URLs, not direct references to the working copy.
Contents of $SVNBASE/branches/skeleton can be accessed locally if the users checks it out.
$ svn checkout $SVNBASE/branches/skeleton $BASE/skeleton
...
However, it is worth to keep our work synchronized with the parent branch since that way we can reduce the efforts needed when we want to put it back, and of course, we should be able put it back to the main line somehow. This is called "integration" or "merging", depending on its direction. Starting from 1.5, Subversion includes a so-called mergeinfo for keeping track of relationships between files that is supposed to make merges easier. Merge information is stored as property of the given branch (directory) and it contains the revisions (and branches) merged to there.
When we are merging from the parent to our branch, we are doing an integration. The purpose of integrations is to keep our own line of development synchronized with the main line, therefore it will be easier to merge our branch back. Integrations also help us to discover and handle problems early by doing continuous merges. Integrations should be done on a regular basis (e.g. once in a week). They are like updates to our branch since branches will be not updated automatically (for a reason).
When we are merging from our branch to parent, we are doing a real merge. This is when we are making all of our work in our branch available for the other members so they can work with them. It is usually done when we are ready, i.e. finished and tested the implementation of a given feature and it is ready for the release. After we have successfully merged our changes back, it is recommended to delete the branch, since using the same branch for more features easily messes up the development. It is possible to move only a small subset of changes back to the parent, e.g. implementing architectural changes that might affect work of others.
Note that merges have to be committed separately.
User bozo updates the skeleton project branch by merging.
$ cd $BASE/skeleton
$ svn merge $SVNBASE/trunk
...
$ svn commit --message "Integrate from trunk"
...
When the branch is finished, he wants to merge it back ("reintegrate") to its parent.
$ svn checkout $SVNBASE/trunk $BASE/trunk
$ cd $BASE
$ svn merge trunk@HEAD skeleton@HEAD trunk
...
$ svn commit --message "Merge the skeleton branch"
...
However, one must be careful with reintegration because Subversion has problems with branches that are still used after they have been already merged back to their parents. Reintegration is called a "reflective" or "cyclic" merge, when the branch appears in the mergeinfo of the parent. That is, when we are trying to use the branch and continue to merge from the parent, the branch will conflict with itself, making the merge a nightmare.
There are usually 3 solutions are possible to defeat this:
Delete the reintegrated branch immediately. If one wants to continue working with the branch, re-branch it from the parent under a different name.
Skip the revision of the reintegration before the first merge after the reintegration. This can be implemented by using the --record-only flag for merge. This causes to record the merge only in the mergeinfo without actually modifying the sources. It requires the revision to be "recorded only" -- which is the revision of the reintegration.
$ svn merge --record-only -c $REVISION $PARENT
Note that this can be only done when the revision to be skipped only contained the changes required for reintegration. Otherwise other changes may be skipped too.
"Rebase" the branch to the first revision after the reintegration in the parent. This can be done by a "reversed reintegration", i.e. when the first merge to the branch after the reintegration is done by reintegration (instead of a regular merge).
$ svn checkout $SVNBASE/trunk $BASE/trunk
$ svn checkout $SVNBASE/branches/skeleton $BASE/sparrow
$ cd $BASE
$ svn merge skeleton@HEAD trunk@HEAD sparrow
...
$ svn commit --message "Reintegrate from trunk"
...
Occasionally it happens that some of the files are in a "conflicted" state after an update or merge. Conflicts are introduced by simultaneous changes of the same file from two sides, as Subversion calls them: "mine" and "theirs". When the Subversion client reports a conflict it creates four versions of the affected file and leaves the resolution to the user. All these four versions are derived from the original file as follows:
The conflicted file (e.g. foo) decorated with markers. Markers show the positions in the file where the same regions were modified in different ways. Syntax of such conflicted regions is the following (where N refers to the latest revision):
<<<<<<< .mine
local changes ("mine")
=======
remote changes ("theirs")
>>>>>>> .rN
A version with extension .mine (e.g. foo.mine). It is the locally modified but uncommitted version of the file that the user had before he started the update or merge. This is called "mine".
A version with extension of the original (unmodified) revision the user had (e.g. foo.r99). This represents the base revision in the user's working copy, i.e. the latest locally updated or committed version of the file. Thus it refers to revision N, which is less than HEAD.
A version with extension of the latest (stored) revision (e.g. foo.r133). This revision is the true latest version stored on the server. This is called "theirs". Essentially, this means that revision of the file changed from N to M (= HEAD) while the user was working with the working copy.
To resolve, conflicted files have to be modified by removing the markers and determining the final (merged) value of the overlapping regions. It can be achieved by simply accepting one of the versions (while discarding the other), or by merging the versions into one. Note that markers are automatically handled by the various graphical merge tools (e.g. TortoiseMerge, WinMerge, sdiff(1) etc.), however the essence of the resolution remains the same.
When all of the markers have been removed from the file, Subversion has to be notified by using the resolved command. It removes the copies mentioned above and marks the given file(s) resolved, ready to be committed.
When finished up with resolving the conflicts, do not forget to commit the results. When only conflicts are resolved, write something like "Resolve conflicts" in the commit message, but when they were part of implementing a merge it is better not to mention them at all.
User bozo wanted to update his working copy of the skeleton project, but one of the files became conflicted.
$ svn update
C   README
Updated to revision 1236.
It must be because he added some text to the README but he has not committed it yet. He opens the README file and tries to resolve the conflict by finding and fixing the marked regions.
<<<<<<< .mine
Note: Skeletons are good!
=======
Note: Skeletons are bad.
>>>>>>> .r1236
By investigating the conflicting versions in question, he decided to remove both of them, since it would be too premature to add an opinion on using skeletons. When he finished editing README, closes it and resolves it.
$ svn resolved README
Resolved conflicted state of 'README'
After every conflict has been resolved, he commits the results.
$ svn commit --message "Resolve conflicts."
Committing is easy :-) Just take a quick review on your local changes then commit them if everything is fine. Local changes can be inspected by the diff ("Check for modifications" in TortoiseSVN) command. The result is usually shown in unified diff format as a list of changes in each file. In this format, lines prefixed with + mean addition, lines prefix with - mean removal, and pairs of them mean modification. These changes are grouped into "hunks", prefixed by their positions in the original file (e.g. @@ -1,4 +1,4 @@). With graphical comparison tools (like TortoiseMerge or WinMerge, Kdiff3, etc.) it is even more visible.
$ svn diff
...
$ svn commit --message "A fancy commit message"
...
Sometimes it is good to check what files have been touched in our local copy. This is can be verified by the status command. It is useful to see whether we added all the new files, what things we have been removed, and what sources are changed. The status command shows the modified files with different prefixes: M means modified in the local copy, A means added in the local copy (and scheduled for addition on the next commit), D means removed in the local copy (and scheduled for removal on the next commit), ? means the given files is not under version control (hence Subversion does not know anything about them), ! means missing files in the local copy, R means replaced files (deleted then re-added without commit), I means ignored files (by adding of the svn:ignore property), finally C refers to a conflicted state.
Note that commits are remembered forever, and with wrong commits it is easy to put the development into an inconsistent state. To avoid mistakes, here are some guidelines on what to do before committing (a short checklist) and how to write reasonable commit messages. This latter is important, since commit messages are a form of documentation and communication:
Makes things easier to be figured out later on, especially when hunting for bugs.
Others might see our commits and they might be curious about what we are doing.
Subversion works with changesets. As its name says, a changeset refers to a set of changes, i.e. changes in the directory structure (adding or removing files), in the files (adding, modifying or removing lines), and in Subversion properties (e.g. whether a file is a binary one, how to handle line endings, etc.). These changes should show up right before the commit in some form (usually as a list).
Check the list of the changed files, check the differences in each file. Are there any unwanted changes?
Changesets should include related changes only, and the commit message should refer to them. If something is not relevant to the current changeset, revert it (or remove from the list), and commit it separately.
Merges should be committed without any further changes. Always resolve conflicts.
Do not forget to update your local copy. Do merges if needed.
Test your changes, do not commit code that will not work.
Avoid committing binary files or files that can be generated. Version control systems are primarily designed for working with text and differences of text files.
Do not leave it empty. Every commit contains something.
Try to describe all the changes you have in the commit. This can be done by looking through the differences covered by the commit and making a list of them.
If your changes are induced by a ticket, add the number of the ticket (e.g. #1738 for Trac).
When integrating from somewhere, write something like that: "Integrate from source".
When merging from somewhere, write something like that: "Merge from source".
Releases are published under a designated version number with a format of X.Y.Z. X is the major, Y is the minor, and Z is patch number. Ideally, there is no need for patch-level releases, but in practice, it is very common to publish additional "bug fix" releases for a given release of version number X.Y. In this case, X.Y establishes a separate line of releases that is detached from the main branch, i.e. trunk. The purpose of this distinction is to keep the new features arriving to trunk isolated from smaller bug fixes without publishing them on each patch-level release.
Branching and isolating releases from the trunk is also important from the view of maintaining a consistent software API (Application Programming Interface) and ABI (Application Binary Interface). A new major release should be created when there are non-compatible changes introduced in the API or ABI of the software, so users of the actual releases will not be affected by upgrading their software by following the same line of releases, only if they decide to switch (migrate) to the new major version. Minor releases should not break any API or ABI, they may only apply incremental changes to the existing ones, i.e. they shall remain backwards compatible. Bugfix releases should not change anything related to the API or ABI, not even the semantics of the user-visible functions.
Before creating a branch for each major release (i.e. establishing a new release line) it is strongly recommended to stabilize the sources under trunk by ''freezing'' it. Code freeze or feature freeze usually means that only changes required for fixing bugs are allowed but no further features should be introduced. The freeze period should start a few weeks before the planned release (depending on the stability of trunk) and the freeze period should end when the new major release branch has been finally created.

Creating releases from the trunk.
A new release line is represented by a branch (from trunk) in the repository with the name X.Y under the directory release. It must be created on each X.Y version, and that will serve as a basis for that release and its potential patches. This is the place where the commits should happen when fixing ("supporting") a previously published version of the software.
For example:
$ svn copy $SVNBASE/trunk $SVNBASE/release/X.Y --message "Branch release X.Y"
...
The initial version of the branch should be always tagged with patch level .0. It should not be present in the real version number of the package, it is only for technical reasons.
$ svn copy $SVNBASE/release/X.Y $SVNBASE/release/X.Y.0 --message "Initial version of X.Y"
It may happen that there is no patch release needed indeed; then the development of the branch stops here.
Bug fixes themselves should always go to trunk (if possible), but they can be merged from there to release/X.Y by (cherry-)picking the revision of the given fix. Let us suppose that a bug was fixed in revision 123456 (r123456) in trunk that should be included in the next patch-level release of version X.Y. All we need to do is just to merge the given revision from trunk. Sometimes it may happen that trunk and the maintained stable branch are diverged from each other way too much -- in this case, some additional adaptation may be required (that is called "backporting the change").
In summary it could be said the purpose of the release/X.Y branch is to collect fixes only that derived from the main line of development.
$ svn checkout $SVNBASE/release/X.Y $BASE/release-X.Y
...
$ cd $BASE/release-X.Y
$ svn merge -r 123456 $SVNBASE/trunk
...
$ svn commit --message "Merge r123456 from trunk"
...
After a release is done (and fixes are prepared to be released), publish it, and tag it in the repository.
$ svn copy $SVNBASE/release/X.Y $SVNBASE/release/X.Y.Z --message "Version X.Y.Z is released."
This way various releases can be collected under the release directory, so they can be accessed later on.
$ svn list $SVNBASE/release
0.1/
0.2/
0.2.1/
0.2.2/
0.3/
0.3.1/
...
In this section, we give recipes on how to implement different tasks in the everyday use by following the guidelines above. This is intended for providing examples, use cases, and scenarios on how to use the proposed system in general.
Recipes are actually brief algorithms with no or with only minimal comments, we chose this way of presentation to make things extremely clear. In some cases, users may need to adapt their actions to the given situation (according to the design), but hopefully this will not happen too often. The different use cases are presented as questions with answers, so one can find one's way by picking the question that one thinks the closest to one's intentions.
Create a branch of trunk and start to work with it.
$ svn copy --message "Create a project for feature_named_foo" $SVNBASE/trunk $SVNBASE/branch/feature_named_foo
Start or join the actual development.
$ svn checkout $SVNBASE/projects/development/feature_named_foo $BASE/feature_named_foo
$ cd $BASE/feature_named_foo
<do some development>
...
<test your changes>
$ svn commit --message "Towards completing feature foo"
...
Repeat until the feature is completed. Do not forget to integrate on a regular basis.
$ cd $BASE/feature_named_foo
$ svn merge $SVNBASE/trunk
<do the merge, resolve conflicts>
...
<test your changes>
$ svn commit --message "Integrate from trunk"
...
Merge your branch in branches back to trunk. If there are private branches for the given branch merge and close them before merging the parent.
$ svn checkout $SVNBASE/trunk $BASE/trunk
...
$ svn checkout $SVNBASE/branches/feature_named_foo $BASE/feature_named_foo
...
$ cd $BASE/feature_named_foo
$ svn merge ../trunk
<do the integration, resolve conflicts>
...
<test your changes>
$ svn commit --message "Final integration from trunk"
$ cd ..
$ svn merge trunk@HEAD feature_named_foo@HEAD trunk
<do the merge, resolve conflicts>
...
$ cd trunk
<test your changes>
$ svn commit --message "Merge feature feature_named_foo: a short summary of the feature" $BASE/trunk
...
When you decide to finish up the development of the given feature completely, it is recommended to delete it from the repository. Obviously it will be not removed from the repository itself but it goes hidden henceforth in order to decrease the noise within the branches directory.
$ svn delete $BASE/feature_named_foo
...
$ svn commit --message "Completed the development of feature_named_foo"
...
Check out or update the trunk branch, do the changes, test them, and commit. If there is a ticket involved, add it to the commit message, then close the ticket with a reference to the changeset. Note that it is also recommended to create a separate branch for fixing complex bugs.
$ svn checkout $SVNBASE/trunk $BASE/trunk
...
$ cd $BASE/trunk
<fixing bug>
<test your changes>
$ svn commit --message "Fix a bug of #1738"
...
All code present in trunk should be built on each X.Y (normal) release.
$ svn checkout $SVNBASE/trunk $BASE/trunk
...
$ cd $BASE/trunk
<prepare, package the release>
...
<do some tests, sanity checks, etc.>
If it is a new year, do not forget to bump the copyright years in the license files, and commit the changes (if there is any).
Branch a new release line for X.Y, the first release of the line will be the tag .0 (implicitly).
$ svn copy $SVNBASE/trunk $SVNBASE/release/X.Y --message "Start release line X.Y."
$ svn copy $SVNBASE/release/X.Y $SVNBASE/release/X.Y.0 --message "Tag the first X.Y release."
Bump the version in the sources. Commit the change to trunk.
$ svn commit --message "Bump version for trunk"
...
Patch releases can be published for any package, independently of the others.
$ svn checkout $SVNBASE/release/X.Y $BASE/release-X.Y
...
$ cd $BASE/release-X.Y
<prepare, package the release>
...
<do some tests, sanity checks, etc.>
...
If everything is correct, bump the patch-level version in the source. If it is a new year, do not forget to bump the copyright years in the license file. Commit the changes.
$ svn commit --message "Prepare language X.Y.Z"
...
Publish the package.
Finally, tag the released revision.
$ svn copy $SVNBASE/release/X.Y $SVNBASE/release/X.Y.Z-language --message "Tag version X.Y.Z."
Depending on which version you want to use, you may need to do one of the following.
For official releases:
$ svn checkout $SVNBASE/release/0.1 $BASE/wundertool-0.1
...
$ cd $BASE/wundertool-0.1
<build, install, etc.>
...
This will check out and install release 0.1 from the central server.
For the latest development version:
$ svn checkout $SVNBASE/trunk $BASE/wundertool-head
...
$ cd $BASE/wundertool-head
<build, install, etc.>
...
Well, that is all.