Through out the next section, the terms 'plug' and 'jack' will be used exactingly. Think of your phone cable at home. A 'plug' is on the cable (it is clear plastic and kind'a squarish). The plug on the cable inserts into a jack (which is very much like a hole either in the wall or in the phone). The plug is the male half of a connection where as a jack is the female half of a connection.
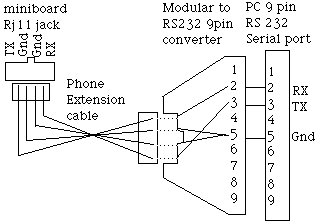
The serial cable connects the PC to the Miniboard for the purpose of downloading 6811 executable programs from the PC to the Miniboard. No off_the_shelf serial cable is a workable solution here, so a Miniboard developer must construct his/her own serial cable. The connector which plugs into the Miniboard is a modular connector (a phone plug) known as an RJ11 plug. On the Miniboard Port D, there is an RJ11 jack (many Miniboards have 3 RJ11 jacks, in that case the serial port is the bottom jack of the three when you hold the Miniboard so that you can read the writing on the 6811 chip). The Miniboard serial cable must have four lines in it (4 wire phone cable works very nicely, get some from Radio Shack or anywhere) which will connect one each to the four pins of an RJ11 plug. The lines will be Transmit Data, Receive Data, and two grounds. On the modular RJ11 plug, the two ground lines are connected to the middle two pins of the RJ11 jack (it does not matter which is which). But the outside two pins are Transmit and Receive Data and must be connected to their particular lines. If you hold a Miniboard so that you are looking down into the RJ11 Jack, and the slotted portion of the jack is facing upwards, then the Transmit pin will be on the left and the Receive pin will be on the right. When connecting the Transmit and Receive lines into the RJ11 plug, make sure that the Transmit and Receive lines/pins on the plug will connect to the Transmit and Receive pins on the jack when the plug is inserted into the jack.
The other side of the serial cable is connected to the PC. Usually a PC will have an RS 232 connector for a serial port. There are two types of RS 232 connectors though, a 25 pin and a 9 pin version. BOTH of the ground lines of the serial cable (the middle two) should connect to the ground pin in the RS 232 connector. If a 25 pin RS 232 connector is being used then pin 2 is transmit, pin 3 is receive and pin 7 is ground. However, if a 9 pin RS 232 connector is used then pin 2 is receive, pin 3 is transmit and pin 5 is ground.
A Macintosh does not use an RS 232 port for serial communications but rather an RS 422 port with an 8 pin mini din connector. The best thing to do is to go buy a Macintosh to PC converter serial cable off the shelf. These come in 9 or 25 pin versions. It does not matter which you buy (a 9 pin is a bit more universally in use), but which ever you buy (9 or 25 pin, Mac to PC serial converter) you must then build an RS 232 serial cable (9 or 25 pin) to match what you bought.
Examine the phone extension cable you just bought, it should have an RJ11
plug at each end. The plugs are clear plastic. Hold both plugs side by side
so that you can observe the color of the wires touching each pin. It is
very important to see if the colors to pin assignments are reversed or not
in the two plugs (they probably are). Remember that the ultimate goal is to
get the TX pin of the Miniboard to touch the RX pin of the PC, the
Miniboard's RX to touch the PC's TX and both of the Miniboards grounds to
touch the PC's one ground. You will have to figure out your own situation
but here follows the necessary connections if a 9 pin RS 232 cable is used
and the phone extension cable does reverse the pins:
ieeecs@hal.elee.calpoly.edu